Accurate inspection of the blade leading edge profile
Accurate inspection of the aerodynamic leading edge profile is essential for ensuring the quality and performance of wind turbine blades. Traditional manual inspection methods using gauges and templates often suffer from inaccuracies, lack of repeatability, and absence of objective documentation. These shortcomings can result in manufacturing deviations, and ultimately energy yield losses.

profileCHECK digitizes the inspection of blade leading edge profiles, combining optical scanning technology with CAD-based references to deliver fast, accurate, and traceable measurements. It bridges the gap between design intent and manufacturing reality:
- Uses the blade’s CAD model as reference
- Triggers a 3D scan of the actual blade surface
- Compares the actual surface with the nominal CAD profile
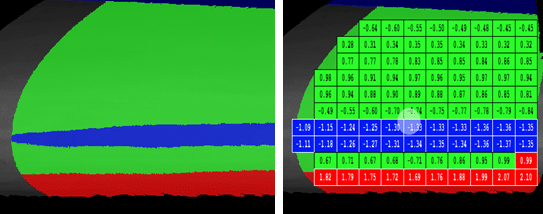
- Highlights deviations using a colored mask overlay
- Automatically generates annotation boxes with precise deviation data
1-Button Operation, zero Post-Processing.
Enabling manufacturers to make faster, better-informed quality decisions.

ISO 17025 Accredited Laboratory
- Gold standard for calibration
- Consistent precision of measurement results
- Traceable to national reference standards

Don’t let the manufacturing deviations affect your blades’ aerodynamic efficiency
Wind Blade Manufacturers
Engineering and R&D Teams
Quality and Compliance Managers
Why Leading Edge Accuracy Matters
- Manufacturing Accuracy Problems: Even minor deviations in the leading edge contour can impact blade aerodynamics.
- Energy Efficiency Losses: Deviations can reduce aerodynamic performance, lowering annual energy production.
Why Traditional Measurement Methods Fall Short
- Traditional Tools Lack Precision: Manual templates are difficult to position consistently and produce non-traceable results.
- Operator Safety: Manual inspection tools are less ergonomic and can pose occupational health and safety (OHS) risks.

FAQ
What is profileCHECK?
profileCHECK is a digital inspection solution that measures and validates the aerodynamic leading-edge profile of wind turbine blades. It compares the actual blade surface to the CAD nominal profile, highlighting deviations in real time and producing fully traceable measurement results.
How does profileCHECK work?
profileCHECK uses cross-sections of the blade’s CAD model as the reference. A 3D scan of the actual blade’s leading edge cross section is performed, and the software compares the scanned with the nominal profile. Deviations are displayed using a colored mask overlay with annotation boxes that document measurement results clearly and objectively.
Why is leading edge accuracy so critical in blade manufacturing?
The leading edge of a wind blade directly affects aerodynamic efficiency and energy production. Even small deviations in contour can result in significant performance losses. Accurate and repeatable inspection of this feature is therefore critical to quality assurance.
How is profileCHECK different from traditional inspection methods?
Unlike manual gauges or templates, profileCHECK:
- Delivers objective, digital results rather than subjective assessments
- Provides repeatable and accurate measurements independent of operator skill
- Creates measurement results traceable to national standards that can be shared with customers or auditors
- Improves safety and ergonomics, removing the need for awkward manual checks
Who can benefit from profileCHECK?
profileCHECK is designed for:
- Wind blade manufacturers who want to improve QA reliability and reduce rework
- Engineering and R&D teams validating production against design intent
- Quality and compliance managers who need transparent, auditable measurement results
What kind of output does profileCHECK provide?
profileCHECK generates:
- Visual overlays showing deviations in color maps
- Annotation boxes with exact deviation values
- Exportable reports for documentation, customer communication, and audits

